Tutorial
This tutorial goes through the basic concepts of Batch with examples.
Import
Batch is located inside the hailtop module, which can be installed as described in the Getting Started section.
>>> import hailtop.batch as hb
f-strings
f-strings were added to Python in version 3.6 and are denoted by the ‘f’ character before a string literal. When creating the string, Python evaluates any expressions in single curly braces {…} using the current variable scope. When Python compiles the example below, the string ‘Alice’ is substituted for {name} because the variable name is set to ‘Alice’ in the line above.
>>> name = 'Alice'
>>> print(f'hello {name}')
hello Alice
You can put any arbitrary Python code inside the curly braces and Python will evaluate the expression correctly. For example, below we evaluate x + 1 first before compiling the string. Therefore, we get ‘x = 6’ as the resulting string.
>>> x = 5
>>> print(f'x = {x + 1}')
x = 6
To use an f-string and output a single curly brace in the output string, escape the curly brace by duplicating the character. For example, { becomes {{ in the string definition, but will print as {. Likewise, } becomes }}, but will print as }.
>>> x = 5
>>> print(f'x = {{x + 1}} plus {x}')
x = {x + 1} plus 5
To learn more about f-strings, check out this tutorial.
Hello World
A Batch consists of a set of Job to execute. There can be
an arbitrary number of jobs in the batch that are executed in order of their dependencies.
A dependency between two jobs states that the dependent job should not run until
the previous job completes. Thus, under the covers a batch is a directed acyclic graph (DAG)
of jobs.
In the example below, we have defined a Batch b with the name ‘hello’.
We use the method Batch.new_job() to create a job object which we call j and then
use the method BashJob.command() to tell Batch that we want to execute echo “hello world”.
However, at this point, Batch hasn’t actually run the job to print “hello world”. All we have
done is specified the jobs and the order in which they should be run. To actually execute the
Batch, we call Batch.run(). The name arguments to both Batch and
Job are used in the Batch Service UI.
>>> b = hb.Batch(name='hello')
>>> j = b.new_job(name='j1')
>>> j.command('echo "hello world"')
>>> b.run()
Now that we know how to create a batch with a single job, we call Batch.new_job()
twice to create two jobs s and t which both will print a variant of hello world to stdout.
Calling b.run() executes the batch. By default, batches are executed by the LocalBackend
which runs jobs on your local computer. Therefore, even though these jobs can be run in parallel,
they are still run sequentially. However, if batches are executed by the ServiceBackend
using the Batch Service, then s and t can be run in parallel as
there exist no dependencies between them.
>>> b = hb.Batch(name='hello-parallel')
>>> s = b.new_job(name='j1')
>>> s.command('echo "hello world 1"')
>>> t = b.new_job(name='j2')
>>> t.command('echo "hello world 2"')
>>> b.run()
To create a dependency between s and t, we use the method
Job.depends_on() to explicitly state that t depends on s. In both the
LocalBackend and ServiceBackend, s will always run before
t.
>>> b = hb.Batch(name='hello-serial')
>>> s = b.new_job(name='j1')
>>> s.command('echo "hello world 1"')
>>> t = b.new_job(name='j2')
>>> t.command('echo "hello world 2"')
>>> t.depends_on(s)
>>> b.run()
File Dependencies
So far we have created batches with two jobs where the dependencies between them were declared explicitly. However, in many computational pipelines, we want to have a file generated by one job be the input to a downstream job. Batch has a mechanism for tracking file outputs and then inferring job dependencies from the usage of those files.
In the example below, we have specified two jobs: s and t. s prints
“hello world” as in previous examples. However, instead of printing to stdout,
this time s redirects the output to a temporary file defined by s.ofile.
s.ofile is a Python object of type JobResourceFile that was created
on the fly when we accessed an attribute of a Job that does not already
exist. Any time we access the attribute again (in this example ofile), we get the
same JobResourceFile that was previously created. However, be aware that
you cannot use an existing method or property name of Job objects such
as BashJob.command() or BashJob.image().
Note the ‘f’ character before the string in the command for s! We placed s.ofile in curly braces so
when Python interpolates the f-string, it replaced the
JobResourceFile object with an actual file path into the command for s.
We use another f-string in t’s command where we print the contents of s.ofile to stdout.
s.ofile is the same temporary file that was created in the command for t. Therefore,
Batch deduces that t must depend on s and thus creates an implicit dependency for t on s.
In both the LocalBackend and ServiceBackend, s will always run before t.
>>> b = hb.Batch(name='hello-serial')
>>> s = b.new_job(name='j1')
>>> s.command(f'echo "hello world" > {s.ofile}')
>>> t = b.new_job(name='j2')
>>> t.command(f'cat {s.ofile}')
>>> b.run()
Scatter / Gather
Batch is implemented in Python making it easy to use for loops to create more complicated dependency graphs between jobs. A scatter is a set of jobs with the same command but varying input parameters. A gather is a final job or “sink” that waits for all of the jobs in the scatter to be complete before executing.
In the example below, we use a for loop to create a job for each one of ‘Alice’, ‘Bob’, and ‘Dan’ that prints the name of the user programatically thereby scattering the echo command over users.
>>> b = hb.Batch(name='scatter')
>>> for name in ['Alice', 'Bob', 'Dan']:
...     j = b.new_job(name=name)
...     j.command(f'echo "hello {name}"')
>>> b.run()
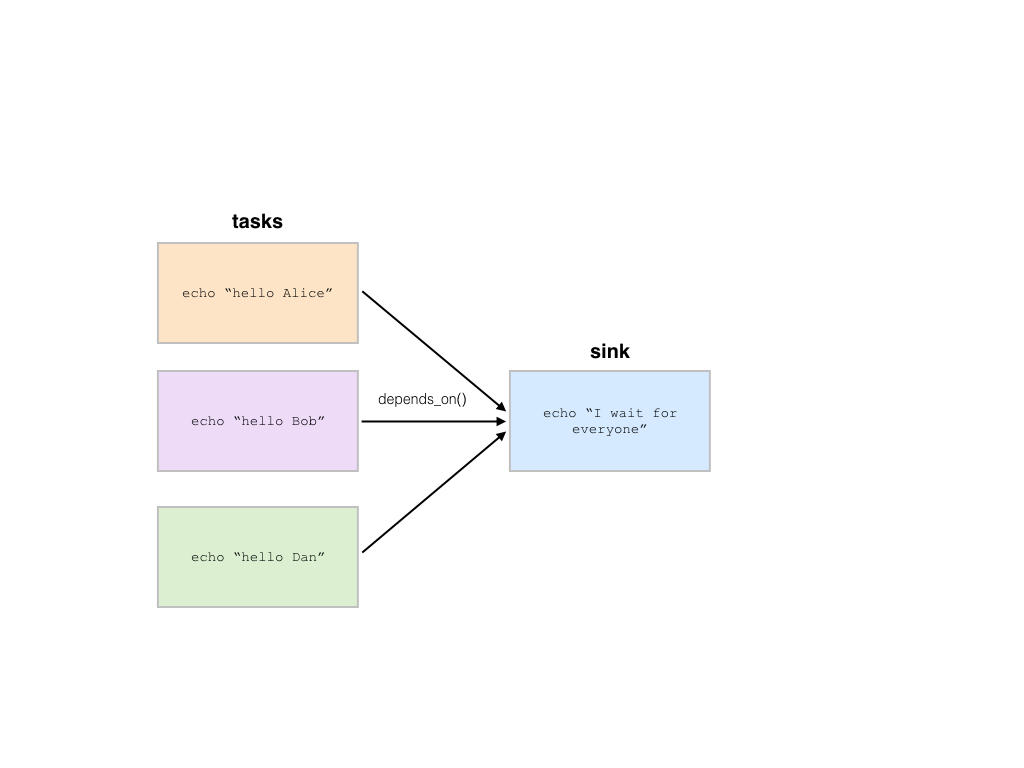
In the previous example, we did not assign the jobs we created for each
user to a unique variable name and instead named it j each time in the
for loop. However, if we want to add a final gather job (sink) that depends on the
completion of all user jobs, then we need to keep track of all of the user
jobs so we can use the Job.depends_on() method to explicitly link
the sink job to be dependent on the user jobs, which are stored in the
jobs array. The single asterisk before jobs is used in Python to have
all elements in the array be treated as separate input arguments to the function,
in this case Job.depends_on().
>>> b = hb.Batch(name='scatter-gather-1')
>>> jobs = []
>>> for name in ['Alice', 'Bob', 'Dan']:
...     j = b.new_job(name=name)
...     j.command(f'echo "hello {name}"')
...     jobs.append(j)
>>> sink = b.new_job(name='sink')
>>> sink.command(f'echo "I wait for everyone"')
>>> sink.depends_on(*jobs)
>>> b.run()
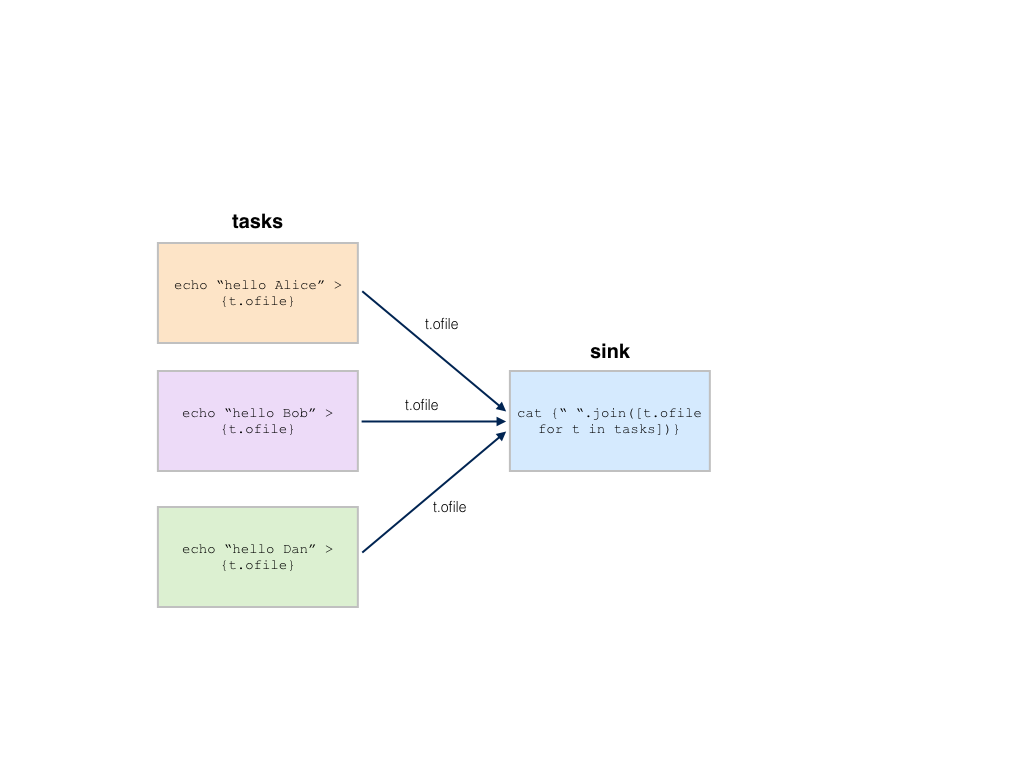
Now that we know how to create a sink job that depends on an arbitrary
number of jobs, we want to have the outputs of each of the per-user jobs
be implicit file dependencies in the sink job (see the section on
file dependencies). The changes from the previous
example to make this happen are each job j uses an f-string
to create a temporary output file j.ofile where the output to echo is redirected.
We then use all of the output files in the sink command by creating a string
with the temporary output file names for each job. A JobResourceFile
is a Batch-specific object that inherits from str. Therefore, you can use
JobResourceFile as if they were strings, which we do with the join
command for strings.
>>> b = hb.Batch(name='scatter-gather-2')
>>> jobs = []
>>> for name in ['Alice', 'Bob', 'Dan']:
...     j = b.new_job(name=name)
...     j.command(f'echo "hello {name}" > {j.ofile}')
...     jobs.append(j)
>>> sink = b.new_job(name='sink')
>>> sink.command('cat {}'.format(' '.join([j.ofile for j in jobs])))
>>> b.run()
Nested Scatters
We can also create a nested scatter where we have a series of jobs per user.
This is equivalent to a nested for loop. In the example below, we instantiate a
new Batch object b. Then for each user in ‘Alice’, ‘Bob’, and ‘Dan’
we create new jobs for making the bed, doing laundry, and grocery shopping. In total,
we will have created 9 jobs that run in parallel as we did not define any dependencies
between the jobs.

>>> b = hb.Batch(name='nested-scatter-1')
>>> for user in ['Alice', 'Bob', 'Dan']:
...     for chore in ['make-bed', 'laundry', 'grocery-shop']:
...         j = b.new_job(name=f'{user}-{chore}')
...         j.command(f'echo "user {user} is doing chore {chore}"')
>>> b.run()
We can implement the same example as above with a function that implements the inner
for loop. The do_chores function takes a Batch object to add new jobs
to and a user name for whom to create chore jobs for. Like above, we create 9 independent
jobs. However, by structuring the code into smaller functions that take batch objects,
we can create more complicated dependency graphs and reuse components across various computational
pipelines.
>>> def do_chores(b, user):
...     for chore in ['make-bed', 'laundry', 'grocery-shop']:
...         j = b.new_job(name=f'{user}-{chore}')
...         j.command(f'echo "user {user} is doing chore {chore}"')

>>> b = hb.Batch(name='nested-scatter-2')
>>> for user in ['Alice', 'Bob', 'Dan']:
...     do_chores(b, user)
>>> b.run()
Lastly, we provide an example of a more complicated batch that has an initial job, then scatters jobs per user, then has a series of gather / sink jobs to wait for the per user jobs to be done before completing.
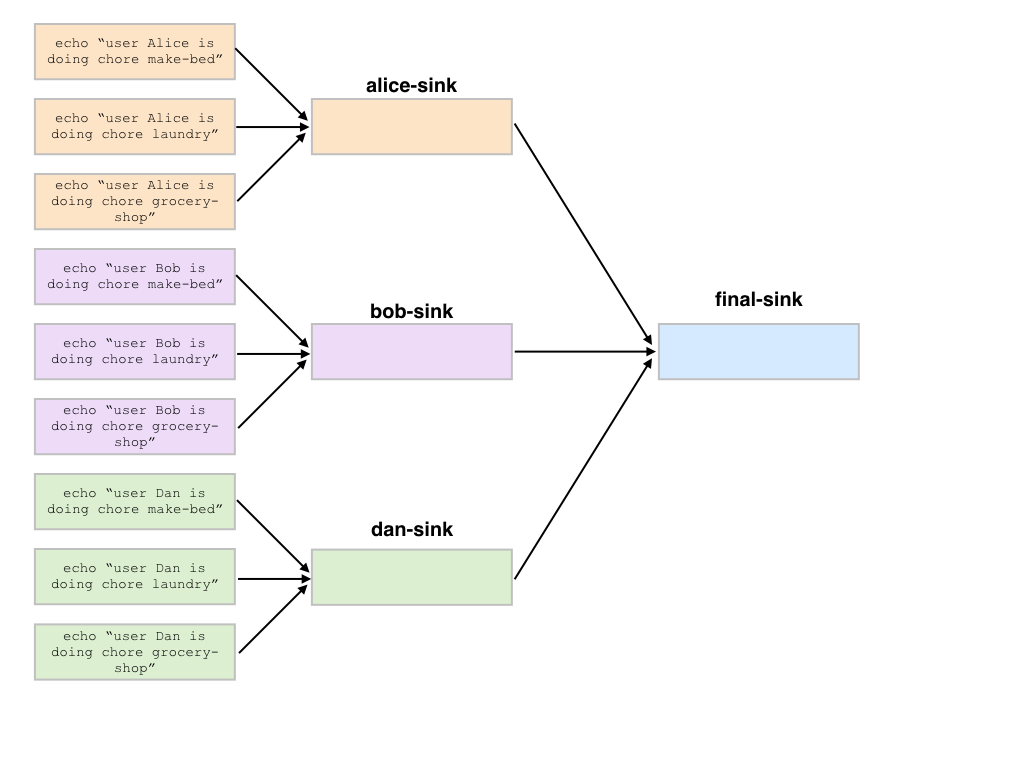
>>> def do_chores(b, head, user):
...     chores = []
...     for chore in ['make-bed', 'laundry', 'grocery-shop']:
...         j = b.new_job(name=f'{user}-{chore}')
...         j.command(f'echo "user {user} is doing chore {chore}"')
...         j.depends_on(head)
...         chores.append(j)
...     sink = b.new_job(name=f'{user}-sink')
...     sink.depends_on(*chores)
...     return sink

>>> b = hb.Batch(name='nested-scatter-3')
>>> head = b.new_job(name='head')
>>> user_sinks = []
>>> for user in ['Alice', 'Bob', 'Dan']:
...     user_sink = do_chores(b, head, user)
...     user_sinks.append(user_sink)
>>> final_sink = b.new_job(name='final-sink')
>>> final_sink.depends_on(*user_sinks)
>>> b.run()
Input Files
Previously, we discussed that JobResourceFile are temporary files and
are created from Job objects. However, in order to read a file that
was not generated by executing jobs (input file), we use the method
Batch.read_input() to create an InputResourceFile. An input
resource file can be used exactly in the same way as a
JobResourceFile. We can refer to an input resource file in a command
using an f-string. In the example below, we add the file data/hello.txt as an
input resource file called input. We then print the contents of input to
stdout in Job j.
>>> b = hb.Batch(name='hello-input')
>>> input = b.read_input('data/hello.txt')
>>> j = b.new_job(name='hello')
>>> j.command(f'cat {input}')
>>> b.run()
Why do we need to explicitly add input files to batches rather than referring
directly to the path in the command? You could refer directly to the path when using the
LocalBackend, but only if you are not specifying a docker image to use when running
the command with BashJob.image(). This is because Batch copies any input files to a special
temporary directory which gets mounted to the Docker container. When using the ServiceBackend,
input files would be files in Google Storage. Many commands do not know how to handle file
paths in Google Storage. Therefore, we suggest explicitly adding all input files as input resource
files to the batch so to make sure the same code can run in all scenarios. Files that are already
in a Docker image do not need to be read as inputs to the batch.
Output Files
All files generated by Batch are temporary files! They are copied as appropriate between jobs
for downstream jobs’ use, but will be removed when the batch has completed. In order to save
files generated by a batch for future use, you need to explicitly call Batch.write_output().
The first argument to Batch.write_output() can be any type of ResourceFile which includes input resource
files and job resource files as well as resource groups as described below. The second argument to write_output
should be either a local file path or a google storage file path when using the LocalBackend.
For the ServiceBackend, the second argument must be a google storage file path.
>>> b = hb.Batch(name='hello-input')
>>> j = b.new_job(name='hello')
>>> j.command(f'echo "hello" > {j.ofile}')
>>> b.write_output(j.ofile, 'output/hello.txt')
>>> b.run()
Resource Groups
Many bioinformatics tools treat files as a group with a common file path and specific file extensions. For example, PLINK stores genetic data in three files: *.bed has the genotype data, *.bim has the variant information, and *.fam has the sample information. PLINK can take as an input the path to the files expecting there will be three files with the appropriate extensions. It also writes files with a common file root and specific file extensions including when writing out a new dataset or outputting summary statistics.
To enable Batch to work with file groups, we added a ResourceGroup object
that is essentially a dictionary from file extension name to file path. When creating
a ResourceGroup in a Job (equivalent to a JobResourceFile),
you first need to use the method BashJob.declare_resource_group() to declare the files
in the resource group explicitly before referring to the resource group in a command.
This is because the default when referring to an attribute on a job that has not been defined
before is to create a JobResourceFile and not a resource group.
In the example below, we first declare that create.bfile will be a resource group with three files. The attribute name comes from the name of the key word argument bfile. The constructor expects a dictionary as the value for the key word argument. The dictionary defines the names of each of the files and the file path where they should be located. In this example, the file paths contain {root} which is the common temporary file path that will get substituted in to create the final file path. Do not use f-strings here as we substitute a value for {root} when creating the resource group!
We can then refer to create.bfile in commands which gets interpolated with the common temporary file root path (equivalent to {root}) or we can refer to a specific file in the resource group such as create.bfile.fam.
>>> b = hb.Batch(name='resource-groups')
>>> create = b.new_job(name='create-dummy')
>>> create.declare_resource_group(bfile={'bed': '{root}.bed',
...                                      'bim': '{root}.bim',
...                                      'fam': '{root}.fam'})
>>> create.command(f'plink --dummy 10 100 --make-bed --out {create.bfile}')
>>> b.run()
As described previously for input files, we need a
separate mechanism for creating a resource group from a set of input files
using the method Batch.read_input_group(). The constructor takes
key word arguments that define the name of the file such as bed to the path
where that file is located. The resource group is then a dictionary of the name
of the attribute to an InputResourceFile.
In the example below, we created an input resource group bfile with three files. The group’s common root file path can be referred to with bfile in a command or you can reference a specific input file such as bfile.fam.
>>> b = hb.Batch(name='resource-groups')
>>> bfile = b.read_input_group(bed='data/example.bed',
...                            bim='data/example.bim',
...                            fam='data/example.fam')
>>> wc_bim = b.new_job(name='wc-bim')
>>> wc_bim.command(f'wc -l {bfile.bim}')
>>> wc_fam = b.new_job(name='wc-fam')
>>> wc_fam.command(f'wc -l {bfile.fam}')
>>> b.run()
Resource File Extensions
If your tool requires a specific extension for the input files in a resource group, then you’d need to create the resource group as follows:
>>> b = hb.Batch(name='resource-file-extensions')
>>> rg = b.read_input_group(**{'txt.gz': 'data/hello.txt.gz'})
>>> rg['txt.gz']
Python Jobs
Up until now we have used the Batch.new_job() method to create a new BashJob.
The jobs run a command that is assumed to be a bash command. However, Batch also has an
alternate type of job called a PythonJob. Unlike BashJob, PythonJob
does not have a BashJob.command() method and instead have a PythonJob.call() method
that takes a Python function to call and the positional arguments and key-word arguments to provide
to the function. The result of PythonJob.call() is a PythonResult which can be
used as either arguments to another PythonJob or to other BashJob by using one
of the methods to convert a PythonResult to a file: PythonResult.as_str(),
PythonResult.as_repr(), and PythonResult.as_json().
In the example below, we first define two Python functions: hello_world() and upper().
Next, we create a batch and then create a new PythonJob with Batch.new_python_job().
Then we use PythonJob.call() and pass the hello_world function that we want to call.
Notice we just passed the reference to the function and not hello_world(). We also add
a Python string alice as an argument to the function. The result of the j.call() is
a PythonResult which we’ve assigned to the variable hello_str.
We want to use the hello_str result and make all the letters in upper case. We call
PythonJob.call() and pass a reference to the upper function.
But now the argument is hello_str which holds the result from calling hello_world
above. We assign the new output to the variable result.
At this point, we want to write out the transformed hello world result to a text file.
However, result is a PythonResult. Therefore, we need to use the PythonResult.as_str()
to convert result to a JobResourceFile with the string output HELLO WORLD ALICE. Now
we can write the result to a file.
def hello_world(name):
    return f'hello {name}'


def upper(s):
    return s.upper()


b = hb.Batch(name='hello')
j = b.new_python_job()
hello_str = j.call(hello_world, 'alice')
result = j.call(upper, hello_str)
b.write_output(result.as_str(), 'output/hello-alice.txt')
b.run()
Backends
There are two backends that execute batches: the LocalBackend and the
ServiceBackend. The local backend is used by default and executes jobs
on your local computer. The service backend executes jobs in a shared compute cluster
managed by the Hail team. To use the Batch Service, follow the directions here.