Batch Service
Warning
The Batch Service is currently only available to Broad Institute affiliates. Please contact us if you are interested in hosting a copy of the Batch Service at your institution.
Warning
Ensure you have installed the Google Cloud SDK as described in the Batch Service section of Getting Started.
What is the Batch Service?
Instead of executing jobs on your local computer (the default in Batch), you can execute your jobs on a multi-tenant compute cluster in Google Cloud that is managed by the Hail team and is called the Batch Service. The Batch Service consists of a scheduler that receives job submission requests from users and then executes jobs in Docker containers on Google Compute Engine VMs (workers) that are shared amongst all Batch users. A UI is available at https://batch.hail.is that allows a user to see job progress and access logs.
Sign Up
For Broad Institute users, you can sign up at https://auth.hail.is/signup.
This will allow you to authenticate with your Broad Institute email address and create
a Batch Service account. A Google Service Account is created
on your behalf. A trial Batch billing project is also created for you at
<USERNAME>-trial. You can view these at https://auth.hail.is/user.
To create a new Hail Batch billing project (separate from the automatically created trial billing project), send an inquiry using this billing project creation form. To modify an existing Hail Batch billing project, send an inquiry using this billing project modification form.
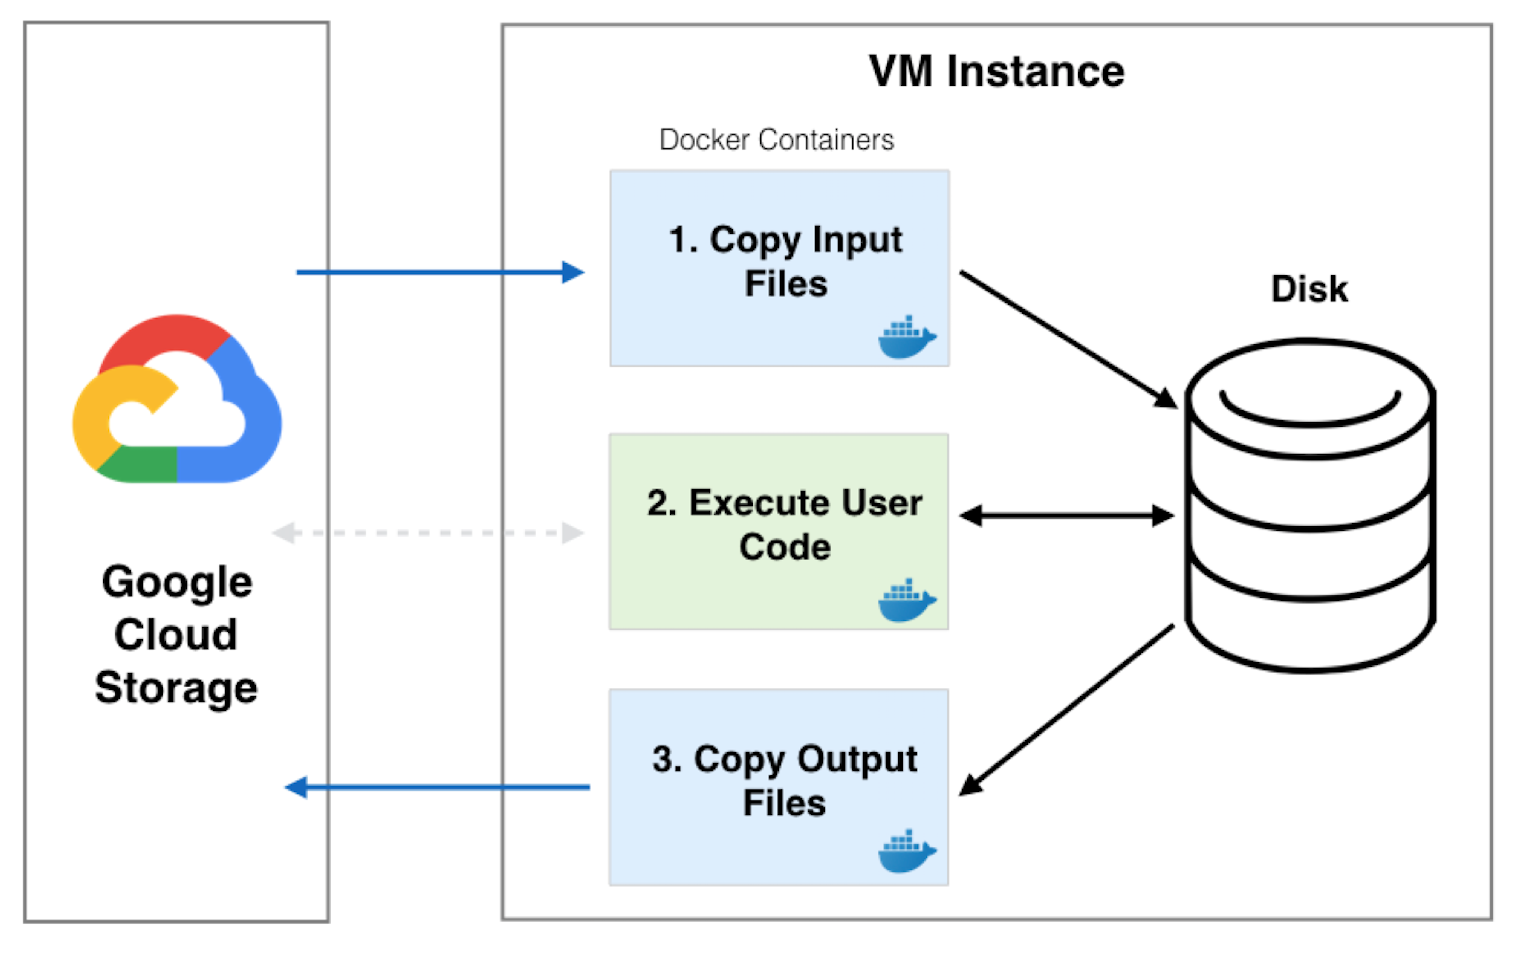
File Localization
A job is executed in three separate Docker containers: input, main, output. The input container
downloads files from Google Storage to the input container. These input files are either inputs
to the batch or are output files that have been generated by a dependent job. The downloaded
files are then passed on to the main container via a shared disk where the user’s code is
executed. Finally, the output container runs and uploads any files from the shared disk that
have been specified to be uploaded by the user. These files can either be specified with
Batch.write_output() or are file dependencies for downstream jobs.
Service Accounts
A Google service account is automatically created for a new Batch user that is used by Batch to download data on your behalf. To get the name of the service account, click on your name on the header bar or go to https://auth.hail.is/user.
To give the service account read and write access to a Google Storage bucket, run the following command substituting SERVICE_ACCOUNT_NAME with the full service account name (ex: test@my-project.iam.gserviceaccount.com) and BUCKET_NAME with your bucket name. See this page for more information about access control.
gcloud storage buckets add-iam-policy-binding gs://<BUCKET_NAME> \
   --member=serviceAccount:<SERVICE_ACCOUNT_NAME> \
   --role=roles/storage.objectAdmin
The Google Artifact Registry is a Docker repository hosted by Google that is an alternative to Docker Hub for storing images. It is recommended to use the artifact registry for images that shouldn’t be publically available. If you have an artifact registry associated with your project, then you can enable the service account to view Docker images with the command below where SERVICE_ACCOUNT_NAME is your full service account name, and <REPO> is the name of your repository you want to grant access to and has a path that has the following prefix us-docker.pkg.dev/<MY_PROJECT>:
gcloud artifacts repositories add-iam-policy-binding <REPO> \
       --member=<SERVICE_ACCOUNT_NAME> --role=roles/artifactregistry.repoAdmin
Billing
The cost for executing a job depends on the underlying machine type, the region in which the VM is running in, and how much CPU and memory is being requested. Currently, Batch runs most jobs on 16 core, spot, n1 machines with 10 GB of persistent SSD boot disk and 375 GB of local SSD. The costs are as follows:
Compute cost
Caution
The prices shown below are approximate prices based on us-central1. Actual prices are based on the current spot prices for a given worker type and the region in which the worker is running in. You can use
Job.regions()to specify which regions to run a job in.= $0.01 per core per hour for spot standard worker types
= $0.012453 per core per hour for spot highmem worker types
= $0.0074578 per core per hour for spot highcpu worker types
= $0.04749975 per core per hour for nonpreemptible standard worker types
= $0.0591515 per core per hour for nonpreemptible highmem worker types
= $0.0354243 per core per hour for nonpreemptible highcpu worker types
- Disk cost
Boot Disk
Average number of days per month = 365.25 / 12 = 30.4375

Cost per GB per month = $0.17

Cost per core per hour = $0.17 * 10 / 30.4375 / 24 / 16
Local SSD
Average number of days per month = 365.25 / 12 = 30.4375

Cost per GB per month = $0.048

Cost per core per hour = $0.048 * 375 / 30.4375 / 24 / 16
= $0.001685 per core per hour
Storage
Average number of days per month = 365.25 / 12 = 30.4375

Cost per GB per month = $0.17

Cost per GB per hour = $0.17 / 30.4375 / 24
- IP network cost
= $0.0003125 per core per hour for nonpreemptible worker types
= $0.00015625 per core per hour for spot worker types
- Service cost
= $0.01 per core per hour
- Logs, Specs, and Firewall Fee
= $0.005 per core per hour
The sum of these costs is $0.02684125 per core/hour for standard spot workers, $0.02929425 per core/hour for highmem spot workers, and $0.02429905 per core/hour for highcpu spot workers. There is also an additional cost of $0.00023 per GB per hour of extra storage requested.
At any given moment as many as four cores of the cluster may come from a 4 core machine if the worker type is standard. If a job is scheduled on this machine, then the cost per core hour is $0.02774 plus $0.00023 per GB per hour storage of extra storage requested.
For jobs that run on non-preemptible machines, the costs are $0.06449725 per core/hour for standard workers, $0.076149 per core/hour for highmem workers, and $0.0524218 per core/hour for highcpu workers.
Note
If the memory is specified as either ‘lowmem’, ‘standard’, or ‘highmem’, then the corresponding worker types used are ‘highcpu’, ‘standard’, and ‘highmem’. Otherwise, we will choose the cheapest worker type for you based on the cpu and memory requests. In this case, it is possible a cheaper configuration will round up the cpu requested to the next power of two in order to obtain more memory on a cheaper worker type.
Note
The storage for the root file system (/) is 5 Gi per job for jobs with at least 1 core. If a job requests less
than 1 core, then it receives that fraction of 5 Gi. If you need more storage than this,
you can request more storage explicitly with the Job.storage() method. The minimum storage request is 10 GB
which can be incremented in units of 1 GB maxing out at 64 TB. The additional storage is mounted at /io.
Note
If a worker is preempted by google in the middle of running a job, you will be billed for the time the job was running up until the preemption time. The job will be rescheduled on a different worker and run again. Therefore, if a job takes 5 minutes to run, but was preempted after running for 2 minutes and then runs successfully the next time it is scheduled, the total cost for that job will be 7 minutes.
Setup
We assume you’ve already installed Batch and the Google Cloud SDK as described in the Getting Started section and we have created a user account for you and given you a billing project.
To authenticate your computer with the Batch service, run the following command in a terminal window:
gcloud auth application-default login
hailctl auth login
Executing this command will take you to a login page in your browser window where you can select your google account to authenticate with. If everything works successfully, you should see a message “hailctl is now authenticated.” in your browser window and no error messages in the terminal window.
Submitting a Batch to the Service
Warning
To avoid substantial network costs, ensure your jobs and data reside in the same region.
To execute a batch on the Batch service rather than locally, first
construct a ServiceBackend object with a billing project and
bucket for storing intermediate files. Your service account must have read
and write access to the bucket.
Next, pass the ServiceBackend object to the Batch constructor
with the parameter name backend.
An example of running “Hello World” on the Batch service rather than locally is shown below. You can open iPython or a Jupyter notebook and execute the following batch:
>>> import hailtop.batch as hb
>>> backend = hb.ServiceBackend('my-billing-project', remote_tmpdir='gs://my-bucket/batch/tmp/')
>>> b = hb.Batch(backend=backend, name='test')
>>> j = b.new_job(name='hello')
>>> j.command('echo "hello world"')
>>> b.run(open=True)
You may elide the billing_project and remote_tmpdir parameters if you
have previously set them with hailctl:
hailctl config set batch/billing_project my-billing-project
hailctl config set batch/remote_tmpdir my-remote-tmpdir
Note
A trial billing project is automatically created for you with the name {USERNAME}-trial
Regions
Data and compute both reside in a physical location. In Google Cloud Platform, the location of data
is controlled by the location of the containing bucket. gcloud can determine the location of a
bucket:
gcloud storage buckets describe gs://my-bucket
If your compute resides in a different location from the data it reads or writes, then you will accrue substantial network charges.
To avoid network charges ensure all your data is in one region and specify that region in one of the following five ways. As a running example, we consider data stored in us-central1. The options are listed from highest to lowest precedence.
-
>>> b = hb.Batch(backend=hb.ServiceBackend())
>>> j = b.new_job()
>>> j.regions(['us-central1'])
The
default_regionsparameter ofBatch:>>> b = hb.Batch(backend=hb.ServiceBackend(), default_regions=['us-central1'])
The
regionsparameter ofServiceBackend:>>> b = hb.Batch(backend=hb.ServiceBackend(regions=['us-central1']))
The
HAIL_BATCH_REGIONSenvironment variable:export HAIL_BATCH_REGIONS=us-central1 python3 my-batch-script.py
The
batch/regionconfiguration variable:hailctl config set batch/regions us-central1 python3 my-batch-script.py
Warning
If none of the five options above are specified, your job may run in any region!
In Google Cloud Platform, the location of a multi-region bucket is considered different from any region within that multi-region. For example, if a VM in the us-central1 region reads data from a bucket in the us multi-region, this incurs network charges becuse us is not considered equal to us-central1.
Container (aka Docker) images are a form of data. In Google Cloud Platform, we recommend storing your images in a multi-regional artifact registry, which at time of writing, despite being “multi-regional”, does not incur network charges in the manner described above.
Using the UI
If you have submitted the batch above successfully, then it should open a page in your browser with a UI page for the batch you submitted. This will show a list of all the jobs in the batch with the current state, exit code, duration, and cost. The possible job states are as follows:
Pending - A job is waiting for its dependencies to complete
Ready - All of a job’s dependencies have completed, but the job has not been scheduled to run
Running - A job has been scheduled to run on a worker
Success - A job finished with exit code 0
Failure - A job finished with exit code not equal to 0
Error - The Docker container had an error (ex: out of memory)
Clicking on a specific job will take you to a page with the logs for each of the three containers run per job (see above) as well as a copy of the job spec and detailed information about the job such as where the job was run, how long it took to pull the image for each container, and any error messages.
To see all batches you’ve submitted, go to https://batch.hail.is. Each batch will have a current state, number of jobs total, and the number of pending, succeeded, failed, and cancelled jobs as well as the running cost of the batch (computed from completed jobs only). The possible batch states are as follows:
open - Not all jobs in the batch have been successfully submitted.
running - All jobs in the batch have been successfully submitted.
success - All jobs in the batch have completed with state “Success”
failure - Any job has completed with state “Failure” or “Error”
cancelled - Any job has been cancelled and no jobs have completed with state “Failure” or “Error”
Note
Jobs can still be running even if the batch has been marked as failure or cancelled. In the case of ‘failure’, other jobs that do not depend on the failed job will still run. In the case of cancelled, it takes time to cancel a batch, especially for larger batches.
Individual jobs cannot be cancelled or deleted. Instead, you can cancel the entire batch with the “Cancel” button next to the row for that batch. You can also delete a batch with the “Delete” button.
Warning
Deleting a batch only removes it from the UI. You will still be billed for a deleted batch.
The UI has an advanced search mode with a custom query language to find batches and jobs. Learn more on the Advanced Search Help page.
Important Notes
Warning
To avoid expensive egress charges, input and output files should be located in buckets that are multi-regional in the United States because Batch runs jobs in any US region.